
One of the best writers for radio, a man famous for, among other things, radio documentaries, passed away 18 October. Norman Corwin was 101, a man whose career hit at about the peak of radio broadcasting as family entertainment.
Although he later wrote for film and TV, as well as several plays, radio was medium in which he most excelled. The spoken word can be the slipperiest of instruments; unsupported by images, with no turning-back of pages, the listener's attention must be gripped and held -- and Corwin was unmatched at doing just that.
Much of his work survives. He will be missed.
(A tip of the hat to alert reader Noel, who brought it to my attention; I knew who Mr. Corwin was but had lost track of him, assuming his passing to have been long ago).
Saturday, October 22, 2011
Monday, October 17, 2011
COINCIDENCE
Radio hams may be a little surprised to learn the paddlewheel steamer USS C. W. Morse, used by the Navy as a receiving ship in WW I, did not specialize in radiomen. Who was C. W. Morse? I don't know. A cursory websearch finds only the ship.
Sunday, October 16, 2011
SET IN TYPE
Set in wooden type, in fact: the Hamilton Wood Type & Printing Museum in Two Rivers, Wisconsin keeps the obscure skill of wooden poster type and printing therefrom alive. (So can you, if you join: they offer studio access as a benefit of membership.)
Wooden poster type? It was the standard; most old posters (and even some new ones), especially the ones run off in huge numbers to promote events, were made with wooden type, offering huge flexibility in font and form.* It was cheaper than cast type, too. How good is it? Have a look at a nice topical example, and you tell me. (Plenty more in their store).
More about wood type can be found at the Rob Roy Kelly American Wood Type Collection at the University of Texas at Austin. It appears the very last commercial manufacturer held on until 2001.
_________________________________-
* Windows users will find a parallel in Word: if regular typesetting is like normal typing in that program, wooden type is the Word Art utility.
Saturday, October 8, 2011
A NEW SOURCE
Have a gander at Hand-Eye Supply. With a primary client base in the art/handicraft printing community, they carry a number of interesting and useful items, including a nice selection of sturdy work clothing and very fine-looking safety glasses.
Not a huge stock but a number of items I've not seen elsewhere.
Not a huge stock but a number of items I've not seen elsewhere.
Friday, October 7, 2011
SHOP TRICK
It's like the old carpenter said, as he hammered the screws into place: "Every trade has its tricks but mine."
Here's one. It's not much of a trick, but it helps keep me out of trouble with a router. You usually need to know the distance between the edges of the routed groove and the edge of the baseplate of the router, so you can clamp a guide down at the proper spot. You can calculate it but it's easy to get tripped up -- and why do it on paper when you can create an example and measure it directly? There you go! It's a lot easier to get everything in the right place with an actual example you can plop down on the work and use to mark it. A real pro might even use it to set dividers and eschew the numbers altogether. Me, I'm an amateur and this makes it easier to visualize how things will turn out.
As you might suppose, I'm building more bookshelves. As ever, I find a ratio of at least 4:1 between the measuring/setting-up and doing the cutting.
(The greenish tint to the freshly-exposed wood? It's a scrap piece of poplar, which often looks a bit green. Very nice to work with, harder than most soft woods. Smoothed and linseed-oiled, it will usually retain the hue.)
Here's one. It's not much of a trick, but it helps keep me out of trouble with a router. You usually need to know the distance between the edges of the routed groove and the edge of the baseplate of the router, so you can clamp a guide down at the proper spot. You can calculate it but it's easy to get tripped up -- and why do it on paper when you can create an example and measure it directly?
 There you go! It's a lot easier to get everything in the right place with an actual example you can plop down on the work and use to mark it. A real pro might even use it to set dividers and eschew the numbers altogether. Me, I'm an amateur and this makes it easier to visualize how things will turn out.
As you might suppose, I'm building more bookshelves. As ever, I find a ratio of at least 4:1 between the measuring/setting-up and doing the cutting.
(The greenish tint to the freshly-exposed wood? It's a scrap piece of poplar, which often looks a bit green. Very nice to work with, harder than most soft woods. Smoothed and linseed-oiled, it will usually retain the hue.)
Monday, October 3, 2011
DREAM CAR
Proud of your new minivan, are you? The one with a flexible interior: repositionable seats, maybe a table? The nice flat-floor unibody automobile, all streamlined and with excellent visibility?
Yes, a heck of a vehicle -- as good an idea now as it was in 1935, when the Stout Scarab first rolled out. What, you've never heard of it? Most people haven't, despite contemporary articles describing it as the coming thing. They were very expensive and only a few were built.
But, allowing for stylistic differences and engine placement, you'll see plenty of its distant descendants on the road today.
(Stumbled over the Scarab looking up the Dymaxion car. Did you know a new one was finished just last year? And they're still tricky to drive).
Friday, September 30, 2011
HAROLD STARK, MASTER STEAM ENGINEER
At the Indiana State Fair this year, Tam and I saw an amazing -- and, I suppose, twee -- miniature steam traction engine, about half-scale, plenty big enough to ride aboard. It was steaming gently, clearly functional.
It turns out to be the work of Harold Stark, Master Steam Engineer, who's been a major part of the working antique farm machinery exhibit at the fair for the past 31 years. He's quite a guy. You'll find the short video and a little biography at Artisan Ancestors.
It turns out to be the work of Harold Stark, Master Steam Engineer, who's been a major part of the working antique farm machinery exhibit at the fair for the past 31 years. He's quite a guy. You'll find the short video and a little biography at Artisan Ancestors.
Sunday, September 11, 2011
IT'S THE PAUSE THAT REFRESHES
Having stumbled into DecoPix, I found a few peeks at the old Coca-Cola plant in Indianapolis (or what purports to be -- the caption says "Indianapolis" but some of the links say "Cincinnati." Heads, race cars; tails, unique chili. Call it!).
We did have a nifty Deco soft-drink building and at least part of it is still around. The city had its very own architectural terra-cotta company, so it's no surprise a lot of the Art Deco and Moderne facades left here are of that type. (The old Stokely-Van Camp building is a particular gem).
...But there are some interiors to reckon with, as well. I've got to go see this barber shop in Circle Tower. (Which is itself a stunning Deco wedding cake on Monument Circle).
Saturday, August 13, 2011
RADIO BOOK WISHLIST
Just the one item -- it seems the late Howard S. Pyle, W7OE, wrote Troubleshooting Amateur Radio Equipment, published by the not late company founded by and named for Howard W. Sams. It's out of print and my first tries at the Usual Sources have turned up nothing. It looks to me as if it would be a very handy book for any ham who likes older radio gear -- but anything Mr. Pyle wrote is worth reading.
Every so often, something he built shows up at the Dayton Hamvention. Yes, you could tell, even without his callsign on the front or back panel. (It usually is) His construction style is distinctive, with well thought-out layouts, neat wiring and sharp, concise photometal labels on everything. His writing is a bit that way too, carefully engineered and logical, though friendly in tone.
His is a name and callsign to watch for at hamfests and used-book stores.
Sunday, July 24, 2011
CHAIR REPAIR
My desk chair here at Roseholme Cottage's ground floor Retrotechnologist HQ (as opposed to the basement ham shack and workbench) is a fair match to my big old oak desk: it's an old-fashioned wooden desk chair, assembled from a kit over a decade ago.
As the years have passed, it has picked up both "character" and damage, the latter being a broken screw holding a stabilizing metal piece to one of the legs of the "truck," and subsequent damage to the 3/8" hanger bolt that fastens that leg to the hollow central post. The result was a rolling chair that tended to go caterwampus without constant attention.
Last week, the lagscrew half of the hanger bolt chewed up the last of the wood it was screwed into -- which meant that tightening the nut and bolt half just pulled the thing loose.
It was time to take action. The stabilizing piece problem, which I had long attributed to the screw bottoming out against the hanger bolt, turned out to be a broken-off part of the original screw. Since it was at 90 degrees to the hanger bolt, that meant there was a fairly simple fix. Here's what it looks like: The fix is hidden: I drilled out the broken screw and glued in a section of dowel, right under the tab on the circled portion; it was more than long enough to intersect and replace the wood worn away where the hanger bolt had been chewing at it, and since I used a 3/4 dowel, wide enough for that job too.
You can see where I scratched up the wood finish on the underside of the leg, trimming the dowel with a flush-cutting saw.
Since there was a little bit of chewed-out hanger-bolt hole left, I drilled it out, too, just enough to have a flat-bottomed hole in which to glue in another short dowel to fill it.
(There's a trick to getting a better bond with smooth dowels: take a pair of slip-joint pliers with nice teeth and notch up the dowel so it will have a rougher surface. Of course, always clamp it it in place while the glue dries).
Twelve hours later, once the glue had dried, I trimmed the dowels flush, held the leg in place and marked it for the stabilizing screw, drilled and installed that screw and then used a pencil stub to mark the bigger hole for the hanger bolt. Drilled that square (by eye), screwed the hanger bolt in, reassembled and hooray, I had a chair again.
But there's one trick here that I didn't tell you. Did you notice? Hint: it just about requires one of these: Remember that broken-off screw? How'd I drill that out of much softer wood -- making a 3/4" hole, yet -- without some kind of damage to the drill "bit,"* the wood or myself, hey?
I cheated. I dodged it. If you have a drill press, you can clamp the work to the table, take the centering drill out of a hole saw of the proper size, and zzipp! drill around the offending bit of metal. The plug broke off at the level of the worn-out hole for the hanger bolt and a sharp 1/2" wood chisel made short work of the remainder.
The little centering drill is there on a hole saw for a reason. Unless you have amazing upper body strength, you can't hold the thing steady while it cuts without it. But a drill press and a good clamp will do the job and make it seem easy.
On the subject of hole saws, shop tricks and "making it look easy," Starrett makes a hole saw arbor (that's the part that holds the cylindrical saw) that replaces the centering drill and allows the assembly to hold two hole saws concentrically. It's an "oops" arbor, for when you holesawed too small a hole; it centers the new size on the mistaken size. They're inexpensive, too -- I figure mine paid for itself the first time I needed it and had it.
(For the observant: yes, my tabletop press has some surface rust. It was a little that way when I bought it. I'm working it over with oil and brass brushes but I haven't got it all yet. I got the table, the base, the chuck and made a start on the column -- need a bigger brush, I was using a worn-out bore brush).
_______________________
* If it has a square or hex cross-section shank and goes in a brace, you call it a bit. Otherwise, those hole-making spun-around thingies you chuck up in press or a hand drill are themselves drills. "Drill bit" is a horrid neologism.
As the years have passed, it has picked up both "character" and damage, the latter being a broken screw holding a stabilizing metal piece to one of the legs of the "truck," and subsequent damage to the 3/8" hanger bolt that fastens that leg to the hollow central post. The result was a rolling chair that tended to go caterwampus without constant attention.
Last week, the lagscrew half of the hanger bolt chewed up the last of the wood it was screwed into -- which meant that tightening the nut and bolt half just pulled the thing loose.
It was time to take action. The stabilizing piece problem, which I had long attributed to the screw bottoming out against the hanger bolt, turned out to be a broken-off part of the original screw. Since it was at 90 degrees to the hanger bolt, that meant there was a fairly simple fix. Here's what it looks like:
 The fix is hidden: I drilled out the broken screw and glued in a section of dowel, right under the tab on the circled portion; it was more than long enough to intersect and replace the wood worn away where the hanger bolt had been chewing at it, and since I used a 3/4 dowel, wide enough for that job too.
You can see where I scratched up the wood finish on the underside of the leg, trimming the dowel with a flush-cutting saw.
Since there was a little bit of chewed-out hanger-bolt hole left, I drilled it out, too, just enough to have a flat-bottomed hole in which to glue in another short dowel to fill it.
(There's a trick to getting a better bond with smooth dowels: take a pair of slip-joint pliers with nice teeth and notch up the dowel so it will have a rougher surface. Of course, always clamp it it in place while the glue dries).
Twelve hours later, once the glue had dried, I trimmed the dowels flush, held the leg in place and marked it for the stabilizing screw, drilled and installed that screw and then used a pencil stub to mark the bigger hole for the hanger bolt. Drilled that square (by eye), screwed the hanger bolt in, reassembled and hooray, I had a chair again.
But there's one trick here that I didn't tell you. Did you notice? Hint: it just about requires one of these:
 Remember that broken-off screw? How'd I drill that out of much softer wood -- making a 3/4" hole, yet -- without some kind of damage to the drill "bit,"* the wood or myself, hey?
I cheated. I dodged it. If you have a drill press, you can clamp the work to the table, take the centering drill out of a hole saw of the proper size, and zzipp! drill around the offending bit of metal. The plug broke off at the level of the worn-out hole for the hanger bolt and a sharp 1/2" wood chisel made short work of the remainder.
The little centering drill is there on a hole saw for a reason. Unless you have amazing upper body strength, you can't hold the thing steady while it cuts without it. But a drill press and a good clamp will do the job and make it seem easy.
On the subject of hole saws, shop tricks and "making it look easy," Starrett makes a hole saw arbor (that's the part that holds the cylindrical saw) that replaces the centering drill and allows the assembly to hold two hole saws concentrically. It's an "oops" arbor, for when you holesawed too small a hole; it centers the new size on the mistaken size. They're inexpensive, too -- I figure mine paid for itself the first time I needed it and had it.
(For the observant: yes, my tabletop press has some surface rust. It was a little that way when I bought it. I'm working it over with oil and brass brushes but I haven't got it all yet. I got the table, the base, the chuck and made a start on the column -- need a bigger brush, I was using a worn-out bore brush).
_______________________
* If it has a square or hex cross-section shank and goes in a brace, you call it a bit. Otherwise, those hole-making spun-around thingies you chuck up in press or a hand drill are themselves drills. "Drill bit" is a horrid neologism.
Monday, July 18, 2011
ENTER THE LINEDRAGON
(I couldn't resist the title).
What's a "LineDragon?" It's a way of supporting vertical feeders for a balanced transmission line and getting them around the roof overhang and gutters. Sunday, I designed and installed the Mk. III: Mark I was a simple section of unpainted 1/2" plywood screwed to one of the joists (or are they rafters?). It worked but it was off-center to the natural drape of the line. A season's worth of weather left it with a permanent skew and wanting to delaminate. Mark II was the center section of the present edition and a 2x4 spacer, but even it wasn't close enough to where it needed to be, so I got out the good miter saw and a drawing pad and ended up with what you see. Short 2x4s screwed to the joists support transverse pieces that in turn hold two more short sections that support the upright, this time in line with the straight-line path between the feedpoint of my G5RV double-Zepp antenna and the feed-through insulators that bring it into my basement ham shack.
The vertical portion, with its "mouth" holding one of the spreader insulators,* bears a resemblance to the prow of a Viking ship and thus, the LineDragon!
More details: You can clearly see the insulator being "chomped." It is held in place by the tension on the feedline leading on up to the center of my antenna (there's another little cheat up the way, a kind of X-brace that carries it clear of the peak of the roof).
Here's the view from below. I installed the 2x4s on the joists first, tacked the transverse pieces in place, then found the proper position for the support assembly by trial and error, clamped it to the transverse pieces and removed it as an assembly to install the fasteners holding that subassembly together. The way, I did the bare minimum of trying to hold parts in place overhead with one hand while driving screws with the other. Even cheating with a battery drill, that's way too much effort!
All done in a mad rush to get it installed before my house-painter returns on Tuesday. I'm probably going to be shooing birds out of it next Spring.
Feel free to borrow and adapt the idea behind this gadget, if it's something you could use.
____________________________
* Simply short lengths of semi-rigid irrigation tubing, with holes drilled to clear the wire and narrow "V" cuts so you can snap it in. This clever idea -- and the all-one-wire antenna and feedline -- was invented, developed and sold by the late Gary Gomph, W7FG; his antennas and line live on at True Ladder Line, as does his callsign at the Gomph Memorial Radio Club. (Another memorial page at this link). W7FG also founded Vintage Manuals, Inc. He'd sold it a few years before his untimely passing and it's still around.
What's a "LineDragon?" It's a way of supporting vertical feeders for a balanced transmission line and getting them around the roof overhang and gutters. Sunday, I designed and installed the Mk. III:
 Mark I was a simple section of unpainted 1/2" plywood screwed to one of the joists (or are they rafters?). It worked but it was off-center to the natural drape of the line. A season's worth of weather left it with a permanent skew and wanting to delaminate. Mark II was the center section of the present edition and a 2x4 spacer, but even it wasn't close enough to where it needed to be, so I got out the good miter saw and a drawing pad and ended up with what you see. Short 2x4s screwed to the joists support transverse pieces that in turn hold two more short sections that support the upright, this time in line with the straight-line path between the feedpoint of my G5RV double-Zepp antenna and the feed-through insulators that bring it into my basement ham shack.
The vertical portion, with its "mouth" holding one of the spreader insulators,* bears a resemblance to the prow of a Viking ship and thus, the LineDragon!
More details:
 You can clearly see the insulator being "chomped." It is held in place by the tension on the feedline leading on up to the center of my antenna (there's another little cheat up the way, a kind of X-brace that carries it clear of the peak of the roof).
Here's the view from below.
 I installed the 2x4s on the joists first, tacked the transverse pieces in place, then found the proper position for the support assembly by trial and error, clamped it to the transverse pieces and removed it as an assembly to install the fasteners holding that subassembly together. The way, I did the bare minimum of trying to hold parts in place overhead with one hand while driving screws with the other. Even cheating with a battery drill, that's way too much effort!
All done in a mad rush to get it installed before my house-painter returns on Tuesday. I'm probably going to be shooing birds out of it next Spring.
Feel free to borrow and adapt the idea behind this gadget, if it's something you could use.
____________________________
* Simply short lengths of semi-rigid irrigation tubing, with holes drilled to clear the wire and narrow "V" cuts so you can snap it in. This clever idea -- and the all-one-wire antenna and feedline -- was invented, developed and sold by the late Gary Gomph, W7FG; his antennas and line live on at True Ladder Line, as does his callsign at the Gomph Memorial Radio Club. (Another memorial page at this link). W7FG also founded Vintage Manuals, Inc. He'd sold it a few years before his untimely passing and it's still around.
Sunday, July 17, 2011
STANCOR 10P TRANSMITTER
Only a few hams owned them, but there were quite a few different commercially-built and kit amateur radio transmitters available between WW I and WW II, especially in the 1930s.
Transformer companies were a particularly fertile source, especially for the smaller, simpler rigs. Thordarson offered a few, Meissner sold the "Signal Shifter" VFO/low-power transmitter; Utah had a cute little 6L6 job (and I think one or two larger ones) and a couple of other firms got in on the multi-company (and higher-power) "All Star" transmitter kit. Stancor was right there, too, with a whole range of transmitters from flea power through at least several hundred Watts, both CW (Morse) and AM (Voice).
The Stancor 10P was either the smallest or the next-smallest, with a 6J5 crystal oscillator driving a 6L6 final, modulated by another 6L6. An '80 did the power supply honors and the whole thing was so cute as to be very nearly twee: Only 10-¾" wide, 6-½" tall and 6-¼" deep, it weighs in at a remarkable 14 pounds. This one came my way at a reasonable price thanks to good luck (and recognizing what it was) at one of the large auction sites. It arrived with fairly complete provenance, tracing it back to the original owner through the late W2WHW, who was the last boatanchor-fan ham to own it before me.
At some point before it graced his hamshack, it was heavily modified with the intent of curing interference to analog television; this was a big problem in the 1950s but was mooted by improvements in TV sets and, ultimately, by digital TV. So I can do what it appears from his notes that '2WHW had planned, and gently return the little transmitter to as close to original condition as possible. It is always handy to have a schematic; this one has had the original white-on-black scheme inverted for more cost-effective print-out. Even more information, including a full parts list, may be found from K7JRL. (Who has a very results-oriented website, an excellent resource!)
I have most of the passive components on order from Antique Electronic Supply and will be posting updates as the project proceeds.
Transformer companies were a particularly fertile source, especially for the smaller, simpler rigs. Thordarson offered a few, Meissner sold the "Signal Shifter" VFO/low-power transmitter; Utah had a cute little 6L6 job (and I think one or two larger ones) and a couple of other firms got in on the multi-company (and higher-power) "All Star" transmitter kit. Stancor was right there, too, with a whole range of transmitters from flea power through at least several hundred Watts, both CW (Morse) and AM (Voice).
The Stancor 10P was either the smallest or the next-smallest, with a 6J5 crystal oscillator driving a 6L6 final, modulated by another 6L6. An '80 did the power supply honors and the whole thing was so cute as to be very nearly twee:
 Only 10-¾" wide, 6-½" tall and 6-¼" deep, it weighs in at a remarkable 14 pounds. This one came my way at a reasonable price thanks to good luck (and recognizing what it was) at one of the large auction sites. It arrived with fairly complete provenance, tracing it back to the original owner through the late W2WHW, who was the last boatanchor-fan ham to own it before me.
At some point before it graced his hamshack, it was heavily modified with the intent of curing interference to analog television; this was a big problem in the 1950s but was mooted by improvements in TV sets and, ultimately, by digital TV. So I can do what it appears from his notes that '2WHW had planned, and gently return the little transmitter to as close to original condition as possible.
 It is always handy to have a schematic; this one has had the original white-on-black scheme inverted for more cost-effective print-out. Even more information, including a full parts list, may be found from K7JRL. (Who has a very results-oriented website, an excellent resource!)
I have most of the passive components on order from Antique Electronic Supply and will be posting updates as the project proceeds.
Saturday, July 16, 2011
RETROTECHNOLOGIST VISITS NATIONAL MOTO+CYCLE
After a thoroughly satisfactory breakfast at a local diner, Tam K and I set out to visit National Moto+Cycle, whose storefront may be found in the same 1920s building as Luna Music and Indie Bike (around the corner). They already had eye-candy waiting out front:
 It's even prettier up close, though the guys were quick to point out that this is a prototype, lacking the custom paint and trim the production models will have. (Notice the helmets in the window, of which I should have taken a closer photo).
Inside, Chief Designer Matty Bennett and his partner-in-vehicularity were waiting and filled with enthusiasm.
National's basic product is a bicycle, but one that hearkens back to the first two decades of the 20th Century, as the "safety bicycle" was at its peak and the first production motorized versions were appearing. But they use modern materials with far better strength-to-weight properties, to produce a bicycle of reasonable weight and retro looks. The race-style turned-down handlebars can be flipped, resulting in a classic recreational/practical bike, or replaced with even more upright "beach cruiser" style handlebars. The bike has a multi-speed kickback hub and optional disc brake system.
...Or you can add a motor! Matty describes it as "like an early production motorized cycle. They're not intended to go superfast," running at the same speeds as city traffic. He plans to add an electric version as well. (More info at this link). The internal-combustion version has a standard twist throttle, kill switch and hand brake.
Sidecars will be available for all versions -- they'll be kept lightweight, in keeping with National's goal of attractive, retro, useful vehicles. As you can see, even the showroom is something of a design engineer's dream.
Both the name and the logo are not a new invention but the return of a very old Indianapolis automaker: between 1900 and 1924, the National Motor Vehicle Company built a successful line of internal-combustion and electric vehicles in their plant at 22nd and the Monon (rather a lot of photos here); the building still stands and is presently The Project School.
Matty himself is the eye and hand behind the look of a number of Broad Ripple institutions, not the least of which is Taste. Between that talent, his background in bicycling, enthusiasm for these bikes and the history of National, I think we're looking at a winner.
I've more photos, from National Moto+Cycle's secret basement proving grounds, but they must wait for another day.
 They already had eye-candy waiting out front:
 It's even prettier up close, though the guys were quick to point out that this is a prototype, lacking the custom paint and trim the production models will have. (Notice the helmets in the window, of which I should have taken a closer photo).
Inside, Chief Designer Matty Bennett and his partner-in-vehicularity were waiting and filled with enthusiasm.
National's basic product is a bicycle, but one that hearkens back to the first two decades of the 20th Century, as the "safety bicycle" was at its peak and the first production motorized versions were appearing. But they use modern materials with far better strength-to-weight properties, to produce a bicycle of reasonable weight and retro looks. The race-style turned-down handlebars can be flipped, resulting in a classic recreational/practical bike, or replaced with even more upright "beach cruiser" style handlebars. The bike has a multi-speed kickback hub and optional disc brake system.
...Or you can add a motor! Matty describes it as "like an early production motorized cycle. They're not intended to go superfast," running at the same speeds as city traffic. He plans to add an electric version as well. (More info at this link). The internal-combustion version has a standard twist throttle, kill switch and hand brake.
Sidecars will be available for all versions -- they'll be kept lightweight, in keeping with National's goal of attractive, retro, useful vehicles.
 As you can see, even the showroom is something of a design engineer's dream.
Both the name and the logo are not a new invention but the return of a very old Indianapolis automaker: between 1900 and 1924, the National Motor Vehicle Company built a successful line of internal-combustion and electric vehicles in their plant at 22nd and the Monon (rather a lot of photos here); the building still stands and is presently The Project School.
Matty himself is the eye and hand behind the look of a number of Broad Ripple institutions, not the least of which is Taste. Between that talent, his background in bicycling, enthusiasm for these bikes and the history of National, I think we're looking at a winner.
I've more photos, from National Moto+Cycle's secret basement proving grounds, but they must wait for another day.
Friday, July 15, 2011
RETRO WHEELS
I have recently found a couple of builders of classic bicycles, one British (Pashley Cycles) and one American (Worksman Cycles, who even make pennyfarthings). Each one offers wonderful bikes, delightfully characteristic of their national traditions. I was thinking it couldn't get any better.
It got better.
Just down the road from my 1924 bungalow -- well, just down the road, around several corners and a few blocks over, which is still quite close -- is a brand-new business, gearing up to offer a product right out of time: National Moto+Cycle builds motorized cycles of the sort that haven't been made in nearly a hundred years. Just click through their "wall photos." You'll see.
My lodger says I stared at the screen, stunned, when I first saw them.
We're got an invitation to stop by tomorrow. I can't make any promises but I will be bringing my camera.
Wednesday, July 13, 2011
HAMFEST FIND
I like this -- and for a dollar, how could I go wrong? United Television Laboratories was, it turns out, a tech school in Lousiville, KY; searching for them turns up a fascinating blog post, with a promotional audio clip and a lot of memories from graduates. "UTL" gave way to "United Electronics Institute" some time in the 1950s; eventually, UEI declined but in their heyday, the school (supposedly, I can't confirm it) even ran its own UHF TV station! (At one time, FCC handed out UHF TV licenses practically for the asking -- and even at that, not all of them made a go of it.)
A version of the meter even showed up in some of their magazine ads. It looks a lot like a Triplett prewar 666-H VOM, both inside and out; if I can find mine, I'll post a photo for comparison, later: (Similar one here). The specific arrangement, with the "OHMS" zero-adjust and pin jacks above the meter, was only used in a few models of Triplett's 666 and it is very likely the United Televison Labs meter is a clone. Update: Or, on reflection, maybe not; at least not of mine, which, Triplett-like, has but a single mode-changing switch. Some earlier versions of the 666 did have an AC/DC selector, though.(Later versions of Triplett's compact meter retained the test-lead lacks at top, in a case otherwise similar to their top of the line VOM, which is still in production).
Though the front panel is a bit bent and some of the hardware is loose, the meter movement seems to have some life in it and if it's intact and the meter rectifier (copper-oxide, a bit difficult to replace) is okay, the VOM can probably be brought back with a little bench time and elbow grease.
 United Television Laboratories was, it turns out, a tech school in Lousiville, KY; searching for them turns up a fascinating blog post, with a promotional audio clip and a lot of memories from graduates. "UTL" gave way to "United Electronics Institute" some time in the 1950s; eventually, UEI declined but in their heyday, the school (supposedly, I can't confirm it) even ran its own UHF TV station! (At one time, FCC handed out UHF TV licenses practically for the asking -- and even at that, not all of them made a go of it.)
A version of the meter even showed up in some of their magazine ads. It looks a lot like a Triplett prewar 666-H VOM, both inside and out; if I can find mine, I'll post a photo for comparison
 (Similar one here). The specific arrangement, with the "OHMS" zero-adjust and pin jacks above the meter, was only used in a few models of Triplett's 666 and it is very likely the United Televison Labs meter is a clone. Update: Or, on reflection, maybe not; at least not of mine, which, Triplett-like, has but a single mode-changing switch. Some earlier versions of the 666 did have an AC/DC selector, though.(Later versions of Triplett's compact meter retained the test-lead lacks at top, in a case otherwise similar to their top of the line VOM, which is still in production).
Though the front panel is a bit bent and some of the hardware is loose, the meter movement seems to have some life in it and if it's intact and the meter rectifier (copper-oxide, a bit difficult to replace) is okay, the VOM can probably be brought back with a little bench time and elbow grease.
Sunday, July 3, 2011
CLOCK LINKS
Some interesting finds this evening.
Older readers may remember the self-winding, centrally-synchronized Western Union clocks, big clocks (face 14" or so in diameter), often with a square wooden case, bearing the company name and proud assurance, "NAVAL OBSERVATORY TIME," often over a red lighting bolt just so you wouldn't miss the point. Radio stations used them, if they could afford the service, (sometimes leading to surprised announcers if the clock was a little off when Western Union sent the synchronizing impulse and the thing skipped ahead during a station break!) and they weren't too uncommon in offices and shops.
They're still around -- they were built to last -- and Ken's Clock Clinic specializes in fixing them. The clocks typically used a couple of big old #6 dry cell "batteries"* and he offers both straight-up replacements for the dry cells and nifty versions that use modern electronics to provide the synchronizing signal, too. (Alas, his repair bench is very busy -- but he does have a waiting list).
Those #6 dry cell replacements are of interest to old-radio folks, too (and even antique telephone hobbyists, since the older types used a local battery to run the carbon microphone; that's what the lower compartment of a wooden wall phone is for). There are other sources, some very authentic with a little effort but the more, the better.
Another old clock you might remember is the Telechron. These wall clocks, in 10" and larger sizes, usually have a small dot about midway between the center and 12 that goes red for 12 hours and white the next, to mark p.m. and a.m. The little 60-cycle synchronous motor uses a sealed rotor and it takes serious skill to open one up and get it running again. And, yes, there's a fellow who does just that, at TelechronClock.com. (I wonder if he would tackle the noisy motor unit from my Numechron Tymeter mechanical digital clock?)
___________________________
* A misnomer, since they consist of a single, large dry Leclanché cell. A battery would be more than one. The irony is, modern #6 "cells" contain 2 or more F or D cells in parallel: they really are batteries.
Monday, June 27, 2011
JOHN LEARY HAMMARLUND RECEIVER
They've started announcing employment anniversaries at work, with little e-mail blurbs. Mine rolled by recently and my department head described me as "...an accomplished radio amateur...." High praise and while I wish those accomplishments included more QSOs, one takes what one can get.
In this case, it was a note from a co-worker" "You're a ham? Did you ever hear of John Leary? He worked for my Dad; we've had this heavy radio he gave us for years. Dad was the only one who listened to it and now it needs to go to someone who will use it." John Leary, W9WHM (SK) was the Andy Warhol of radio restorations -- no, more like the Mad Potter of Biloxi. Just as George Ohr managed astonishing technical feats in pottery, often in stunningly bright colors, W9WHM did with radios -- mostly, Hammarlund SP-600s. They're already very good tube-era receivers, but by the time he was done with them, they were outstanding, boasting stability as good as or better than solid-state, low noise, excellent selectivity and good sensitivity. They were quite often done up in unexpected colors -- electric blue, acid green, hot orange. This example (which may contain an ex-mouse) is quite sedate, in gray, black and a muted red. (More info here, in a big PDF). It almost violates my "No radios I can't lift unaided" rule, though.
An unexpected and delightful gift, accompanied by personal recollections: "He was a good guy. Kind of politically incorrect and he made terrible coffee, but a very good man." Not such a bad way to be remembered.
In this case, it was a note from a co-worker" "You're a ham? Did you ever hear of John Leary? He worked for my Dad; we've had this heavy radio he gave us for years. Dad was the only one who listened to it and now it needs to go to someone who will use it."
 John Leary, W9WHM (SK) was the Andy Warhol of radio restorations -- no, more like the Mad Potter of Biloxi. Just as George Ohr managed astonishing technical feats in pottery, often in stunningly bright colors, W9WHM did with radios -- mostly, Hammarlund SP-600s. They're already very good tube-era receivers, but by the time he was done with them, they were outstanding, boasting stability as good as or better than solid-state, low noise, excellent selectivity and good sensitivity. They were quite often done up in unexpected colors -- electric blue, acid green, hot orange. This example (which may contain an ex-mouse) is quite sedate, in gray, black and a muted red. (More info here, in a big PDF). It almost violates my "No radios I can't lift unaided" rule, though.
An unexpected and delightful gift, accompanied by personal recollections: "He was a good guy. Kind of politically incorrect and he made terrible coffee, but a very good man." Not such a bad way to be remembered.
Saturday, June 25, 2011
RADIO DOES IT ALL: 1930S
This photo won't be up forever but the article's title, from Short Wave Craft for June, 1930, is too wonderful not to share:
Short Waves Outwit the Oyster.
How about that!
Short Waves Outwit the Oyster.
How about that!
Tuesday, June 7, 2011
LIGHT AS A FEATHER
All retrotechnologists know that Interesting Things are found in leatherette cases: This one's layered:
 Finally! Looks a little crowded...
 ...But it unfolds! It's a Singer Featherweight, a remarkably small, full-function sewing machine, still very popular today despite not having been in production for a generation.
 Here's a look at the other side:
 This is a fairly recent auction-site purchase; initial checks showed it functioning, which is a good thing, as I've some mending to get to.
Ever since Mrs. Shoames showed up at a BlogMeet with one of these, I've wanted one. My old machine (a thrift-shop 1960s Kenmore, which is to say a rebadged Singer) works well but weighs so much as to be off-putting and is in need of a new speed control. The little Featherweight is very highly spoken of and is a lot easier to carry.
That green plastic box is a buttonhole attachment. --And the next time y'all are inclined to think the distaff set is lacking in mechanical aptitude, you try setting up one of those gadgets, same as your grandmother or mother did, and see how it goes.
I was delighted to find it at an only mildly painful price. Best of all, it's got the same wonderful looks as the (nearly full-size) Singer 99 I learned on -- Mom had one, old when it came to her. Between that and Vibroplex telegraph keys, I think I was left with a lasting impression that all really good technology was enamelled black, with gold striping.
 This one's layered:
 Finally! Looks a little crowded...
 ...But it unfolds! It's a Singer Featherweight, a remarkably small, full-function sewing machine, still very popular today despite not having been in production for a generation.
 Here's a look at the other side:
 This is a fairly recent auction-site purchase; initial checks showed it functioning, which is a good thing, as I've some mending to get to.
Ever since Mrs. Shoames showed up at a BlogMeet with one of these, I've wanted one. My old machine (a thrift-shop 1960s Kenmore, which is to say a rebadged Singer) works well but weighs so much as to be off-putting and is in need of a new speed control. The little Featherweight is very highly spoken of and is a lot easier to carry.
That green plastic box is a buttonhole attachment. --And the next time y'all are inclined to think the distaff set is lacking in mechanical aptitude, you try setting up one of those gadgets, same as your grandmother or mother did, and see how it goes.
I was delighted to find it at an only mildly painful price. Best of all, it's got the same wonderful looks as the (nearly full-size) Singer 99 I learned on -- Mom had one, old when it came to her. Between that and Vibroplex telegraph keys, I think I was left with a lasting impression that all really good technology was enamelled black, with gold striping.
Monday, June 6, 2011
TREE SWING
Retrotech is fun for me and folks similarly inclined, but this, I think, has a wider appeal: a tree swing!
 A good, old-fashioned tree swing. The seat is red oak, assembled with carpenter's glue and wood screws (with predrilled holes: it's very hard even as oak goes!). Since it goes outdoors, I cheated on the finish, multiple coats of polyurethane.
 It has battens at each end and a lengthwise "rib," which makes it very sturdy. The 5/16" U-bolts (with fender washers and spring lockwashers) probably should be 3/8" or even 1/2" instead, but they'll do for now. They are the better grade, at least: check carefully and you'll discover some U-bolts are marked with a warning to not use them to support weight!
Most of the smoothing was done with planes and a scraper. It looks great but the seat is almost too smooth.
The knots are not as awful as they look; hidden in there are bowlines-on-a-bight at each side, with a series of clumsy hitches around them to take up the free end of each rope.
This project required a25" 25-foot ladder (not 2' 1", much as I enjoy scale models I'm not one)* to reach the limb -- Jim the Tree Guy installed the ropes but I had to relocate my ham antenna: It ended up higher and farther away from the trunk of the tree, which is an improvement. The swing ropes clear the wire by a comfortable margin; the photo, shot from ground level, is a little misleading.
___________________________________
* And a nod to Charles for catching my typo.
 A good, old-fashioned tree swing. The seat is red oak, assembled with carpenter's glue and wood screws (with predrilled holes: it's very hard even as oak goes!). Since it goes outdoors, I cheated on the finish, multiple coats of polyurethane.
 It has battens at each end and a lengthwise "rib," which makes it very sturdy. The 5/16" U-bolts (with fender washers and spring lockwashers) probably should be 3/8" or even 1/2" instead, but they'll do for now. They are the better grade, at least: check carefully and you'll discover some U-bolts are marked with a warning to not use them to support weight!
Most of the smoothing was done with planes and a scraper. It looks great but the seat is almost too smooth.
The knots are not as awful as they look; hidden in there are bowlines-on-a-bight at each side, with a series of clumsy hitches around them to take up the free end of each rope.
This project required a
 It ended up higher and farther away from the trunk of the tree, which is an improvement. The swing ropes clear the wire by a comfortable margin; the photo, shot from ground level, is a little misleading.
___________________________________
* And a nod to Charles for catching my typo.
Friday, May 20, 2011
THE DAYTON HAMVENTION
...I have returned from it completely wiped out. Gone. I picked up some first-rate geekery, which will show up here and there.
Huge live-as-it happened photoblogging is ready for your viewing pleasure at Turk's place! I'll have more -- after I have slept. Today started around 0100. In the morning.
Huge live-as-it happened photoblogging is ready for your viewing pleasure at Turk's place! I'll have more -- after I have slept. Today started around 0100. In the morning.
Sunday, May 1, 2011
WHAT IZZIT?
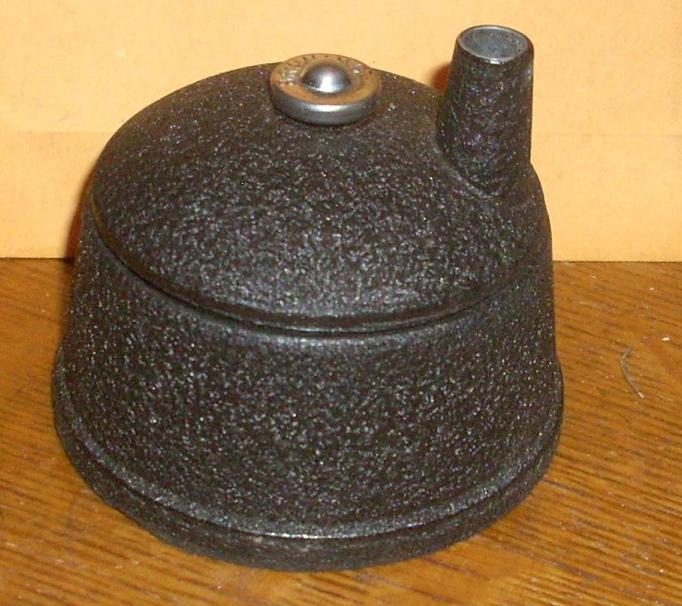
Do you recognize it? Still not totally uncommon, though this sort is a little bit special: (No, it's not a UFO!)
Post your answer in comments. Be specific.
 (No, it's not a UFO!)
Post your answer in comments. Be specific.
Sunday, April 24, 2011
3-D MOVIES: OLDER THAN YOU KNEW
Three-dimensional moving pictures -- a big deal in the 1950s, a big deal again recently and a big deal in 1861.
Meet the kinematoscope: a series of stereopticon slides displaying chronologically successive images, viewed by peering into an eyepiece. In many way, it presages Mr. Edison's (2-D!) kinetoscope by thirty years, though with much shorter playing times and less-smooth motion.
And for the fellow proud of his high-definition 3DTV, I'll point out the 19th-centry sterograph camera is a good match to 1080p for resolution, perhaps better. But take heart, you've got color!
Wednesday, April 20, 2011
WE'RE ALL NOVICES NOW
Ever since the FCC dropped the higher-speed code requirements, some of the nicer touches of operating procedures for CW have become a bit more difficult to pick up.
Of course, they were never that simple to come by. Bad habits tend to sprawl. Back when John Huntoon edited QST, he printed an article by W6DTY* that summarizes good operating without being stuffy or too preachy. It went over well enough that ARRL reprinted it as a handout and sent it to new hams; and now, YOUR NOVICE ACCENT And What To Do About It is available as a PDF, thanks to N4MW.
If you're still working on learning the code, Mr. Huntoon addressed that himself, in 1941: This Business Of Code is still excellent advice.
(Interestingly, I find 4 hams of that name current at QRZ.com, one of them in East Hartford, CT. The former QST editor was a teenager in the late 1930s.)
A side note, there's a website devoted to radio work on the Great Lakes and major rivers -- fascinating! Yes, even paddlewheel steamers had their "Sparks" once radio came along.
_____________________________
* Keith Williams, then. The callsign is presently held by, as FCC puts it, "a close relative of the former holder." This mode of remembrance is one of the Commission's more graceful accommodations.
Monday, April 11, 2011
T21 TRANSMITTER
Promised a week ago, here at last, a fine example of breadboard construction: The tube in the center is the T21, a 6L6 offspring. A plain 6L6G should work fine.
 The tube in the center is the T21, a 6L6 offspring. A plain 6L6G should work fine.
Wednesday, April 6, 2011
WHAT'S MORE RETRO THAN MODEL TRAINS?
Just about nothing could be more of a harkening-back, especially the classic, three-rail "O" gauge. And yet something seems just a little...different about this fellow's layouts:
And not just the everything's-moving endless loop in the foreground -- have a gander at the classic Christmas tree in the background! (Just the thing for a South Pole Christmas). There are a few more views at Trainfacts, too. --And even more.
I stumbled onto this delightful invention (and the pleasant, highly-talented fellow responsible for it) researching a high-end component for work.* For years, I've claimed the only thing that kept me from having a model train layout was the lack of space; I've looked with interest at some of the very small-scale setups, especially the "mountainside" ones that are more vertical than horizontal (much too tricky for a beginner, I'm told, as it's a delicate balancing act between grade and traction) . Well, those excuses have been shot right down if I could be running my own rail line on the living room ceiling.
(It just occurred to me that some fan of The Fifth Element is probably planning a vertical building-side passenger express already. Can't find an example online but it would be very fine).
I'm going to add this to the "Live Steam" category; sure, the models are (mostly) electric but many of the originals were not.
P.S.: Speaking of train layouts in interesting places...! Wow.
_________________________________
* A Penny + Giles conductive plastic rotary fader, a "volume control" to us mere mortals, but a well-nigh indestructible one. There's one operating position on the ol'Starship Lupine local Skunk-Workings where the guys keep wearing out a speaker-volume control and it would be nice to only have to replace it once. Now, to convince the boss. And the boss's accountants.
And not just the everything's-moving endless loop in the foreground -- have a gander at the classic Christmas tree in the background! (Just the thing for a South Pole Christmas). There are a few more views at Trainfacts, too. --And even more.
I stumbled onto this delightful invention (and the pleasant, highly-talented fellow responsible for it) researching a high-end component for work.* For years, I've claimed the only thing that kept me from having a model train layout was the lack of space; I've looked with interest at some of the very small-scale setups, especially the "mountainside" ones that are more vertical than horizontal (much too tricky for a beginner, I'm told, as it's a delicate balancing act between grade and traction) . Well, those excuses have been shot right down if I could be running my own rail line on the living room ceiling.
(It just occurred to me that some fan of The Fifth Element is probably planning a vertical building-side passenger express already. Can't find an example online but it would be very fine).
I'm going to add this to the "Live Steam" category; sure, the models are (mostly) electric but many of the originals were not.
P.S.: Speaking of train layouts in interesting places...! Wow.
_________________________________
* A Penny + Giles conductive plastic rotary fader, a "volume control" to us mere mortals, but a well-nigh indestructible one. There's one operating position on the ol'
Friday, April 1, 2011
ANOTHER 6L6 RIG
This transmitter was designed around the Taylor T21...which is a 6L6 with a six-pin base. Another, similar bit of 6L6 cloning was the Raytheon RK49. (There's a top-view photo of the little transmitter in the "Radio" handbook for 1940 -- I'll see about scanning it this evening.)
There is a reason for this: the 6-pin base has wider spacing between pins and will run higher voltages with less chance of an arc-over. Especially important at radio frequencies. The Raytheon appears to have a ceramic base. I'm not sure what Taylor used.
In most HF applications that aren't pushing the tube too hard, you can substitute a 6L6G/GA/GB for these tubes without much trouble.
BTW, these things can become quite valuable -- there's a Utah "Junior" single-6L6 transmitter, albeit a very fancy one, about to change hands for over $500 on an auction site.
Update: Bruce, W1UJR, points out in comments that it's more fun to restore a Utah Junior than buy one bandbox-new. He's right -- and has done a first-class renewal on his.
Sunday, March 27, 2011
A TRANSMITTER POWER SUPPLY
It's surprising how quickly you get into trouble, fiddling with power supply designs. Duncan's PSU2 software does help keep the worst mistakes inside the computer instead of on the test bench, but there's no substitute for the real thing.
Fred Sutter's original "QST-40" power supply is a nice study in empirical design. He used a choke-input supply for stability under varying loads and a fairly low-resistance bleeder resistor to keep the B+ from soaring between Morse elements. The power transformer is one a contemporary ham could have readily salvaged and the rest of the parts were pretty stock -- in 1938.
Today, we have fewer choices. Specs are more stringent, too; there's usually more safety margin for a given current rating and modern measurements of choke values are less optimistic. Hammond transformer has probably got the widest range and availability of any outfit still making tube-suitable iron, so I've worked from their catalog. It's good news and bad news; the plate transformer will run $80 to $100 and the filter choke is another $46 to $50, but you can get them;* the rest of the parts are quite reasonable.
Here's the untested, not-yet-built power supply so far: (Click on it for a large version) There are a couple of options for the transformer and different filter circuits for each one -- either a 279X (850VCT at 170 mA) using a choke-input filter (leave out the 8 uF filter condenser!) or a 273BX (700 VCT, 175 mA), with a pi-section filter. As I have noted on the drawing, you really don't want to try the pi-section filter with the higher-voltage transformer.
5U4 or 5Z3 is your choice; the former is an octal tube, the latter 4-pin but they're otherwise the same. 83V is another possibility.
I also detail two options for the bleeder resistor, which additionally supplies lower B+ voltage to the screen of the 6L6.
The biggest change is in how the B+ is turned on and off; the five and dime no longer sells nice ceramic-based knife switches (more's the pity) and even if they did, it's not a very user-friendly means to that end. So instead, I added separate filament transformers for the 5u4/5Z3 rectifier and 6L6. This results in two good things and one "gotcha:"
1. Now you can turn the B+ on and off by switching the primary voltage; you can even do fancy pilot lights for filament and plate voltage, just like the big rigs!
2. With no heater voltage being drawn, the plate transformer's got a little oomph to spare. (If it has too much, Hammond provides primary taps for 115 and 125V mains).
3. Mind that heater transformer for the rectifier! It's only providing 5V to the tube but it's got the full B+ voltage on the secondary. Hammond hi-pots them at 2kV and it uses "two-bobbin" construction, with primary and secondary on their own plastic spools, butfabricat emptor caveat fabor, or however Cicero would've said it.
The output connector is notional at best; you can still find the old Amphenol plugs and sockets at places like Radio Daze and hamfests. A terminal strip would work as well -- just keep your pets and extremities clear!
I'll close by repeating that this circuit has not been built and tested. While I have done my best to predict how it might behave, I cannot verify its safety or suitability; proceed at your own risk. (On first power-up, I'd want a big old 100W or 60W incandescent in series with the hot side of the incoming power, and I'd use a GFI-switched outlet strip to turn it off and on. I'm not much for excitement.)
_____________________
* Angela Instruments, listed under "Sources" in the sidebar, seems to have the best prices at this writing. Antique Electronic Supply, Radio Daze and Parts Express all stock Hammond transformers.
Fred Sutter's original "QST-40" power supply is a nice study in empirical design. He used a choke-input supply for stability under varying loads and a fairly low-resistance bleeder resistor to keep the B+ from soaring between Morse elements. The power transformer is one a contemporary ham could have readily salvaged and the rest of the parts were pretty stock -- in 1938.
Today, we have fewer choices. Specs are more stringent, too; there's usually more safety margin for a given current rating and modern measurements of choke values are less optimistic. Hammond transformer has probably got the widest range and availability of any outfit still making tube-suitable iron, so I've worked from their catalog. It's good news and bad news; the plate transformer will run $80 to $100 and the filter choke is another $46 to $50, but you can get them;* the rest of the parts are quite reasonable.
Here's the untested, not-yet-built power supply so far:
 (Click on it for a large version) There are a couple of options for the transformer and different filter circuits for each one -- either a 279X (850VCT at 170 mA) using a choke-input filter (leave out the 8 uF filter condenser!) or a 273BX (700 VCT, 175 mA), with a pi-section filter. As I have noted on the drawing, you really don't want to try the pi-section filter with the higher-voltage transformer.
5U4 or 5Z3 is your choice; the former is an octal tube, the latter 4-pin but they're otherwise the same. 83V is another possibility.
I also detail two options for the bleeder resistor, which additionally supplies lower B+ voltage to the screen of the 6L6.
The biggest change is in how the B+ is turned on and off; the five and dime no longer sells nice ceramic-based knife switches (more's the pity) and even if they did, it's not a very user-friendly means to that end. So instead, I added separate filament transformers for the 5u4/5Z3 rectifier and 6L6. This results in two good things and one "gotcha:"
1. Now you can turn the B+ on and off by switching the primary voltage; you can even do fancy pilot lights for filament and plate voltage, just like the big rigs!
2. With no heater voltage being drawn, the plate transformer's got a little oomph to spare. (If it has too much, Hammond provides primary taps for 115 and 125V mains).
3. Mind that heater transformer for the rectifier! It's only providing 5V to the tube but it's got the full B+ voltage on the secondary. Hammond hi-pots them at 2kV and it uses "two-bobbin" construction, with primary and secondary on their own plastic spools, but
The output connector is notional at best; you can still find the old Amphenol plugs and sockets at places like Radio Daze and hamfests. A terminal strip would work as well -- just keep your pets and extremities clear!
I'll close by repeating that this circuit has not been built and tested. While I have done my best to predict how it might behave, I cannot verify its safety or suitability; proceed at your own risk. (On first power-up, I'd want a big old 100W or 60W incandescent in series with the hot side of the incoming power, and I'd use a GFI-switched outlet strip to turn it off and on. I'm not much for excitement.)
_____________________
* Angela Instruments, listed under "Sources" in the sidebar, seems to have the best prices at this writing. Antique Electronic Supply, Radio Daze and Parts Express all stock Hammond transformers.
TYPEWRITER DOCTOR
There are fewer typewriter shops today than there were last week. There will probably be fewer tomorrow.
--But the ones that are left are generally run by men (and women) who wouldn't choose anything else. For instance, Cambridge Typewriter in Boston, recently visited by Marko of The Munchkin Wrangler. It looks like a wonderful place! (And the owner has a blog, too).
When you find a typewriter shop, don't keep it a secret; we need to make sure they've got plenty of work, so they'll still be around when our machines need attention.
Friday, March 25, 2011
ABOUT THE QSL TRANSMITTERS
First, a quick note about safety. Fred Sutter, W8QBW, was of retirement age in 1938. His designs suggest a fellow who had been working with radio for many years and like most of his peers, Mr. Sutter was more casual about high voltage than most hams are today; he assumed his readers know the risks.
He got away with it because he was very aware of the dangers. You probably haven't spent your ham career being "tickled" by the occasional contact with B+ batteries; you are unlikely to have ever used a #2 pencil to draw a hissing arc from the tank coil of a transmitter and it is almost certain you have never keyed a spark transmitter operating from wall-socket juice. So you and I don't have quite the same learned reflexes the old-timers had.
One of the less obvious "gotchas" in the QSL-40 is the DC power connection; it's a 5 or 6-pin socket on the back of the transmitter and the output from the power supply is connected to a plug. That's dangerous; there's all manner of juice on those pins. You could still buy that kind of plug and socket new through last year -- it looks as if Cooper Interconnect has discontinued them -- but they work just as well with the plug mounted to the transmitter side and the socket on the power supply.
The big RF coil's connections are "live," too; you must keep your fingers clear of them when tuning the transmitter. For that matter, the tuning knob provides the only isolation from HV DC on the shaft of the tuning condenser. He picked the right knob for the job, an Ohmite rheostat knob* made of real Bakelite with a deeply-recessed setscrew, but you probably haven't got one of those handy. So that may need to be designed around. The power supply design is simply unsafe; he used a ceramic-base knife switch to turn the B+ off and on, at a point 600 VAC above ground. He took precautions, but he had experience and parts that cannot be obtained today. I'm working on a "modernized" redesign of the power supply and hope to have a tentative version posted some time this weekend.
There's a little about safety. Now, about history--
There was a whole series of "QSL" rigs, from a 5W transformerless "portable" you could hold in one hand (though not when it was plugged in!) to a 100W push-pull design, with side ventures into a tiny receiver, making "air-wound" RF coils and the use of pilot lights as current indicators.
It had to start somewhere. It didn't start where you'd think or even with the goal you might expect: "Radio" was, in some ways, the West Coast competition to the ARRL's "QST." Formed by the merger of "R/9," a smaller ham magazine with very high production values and the original "Radio," a large-format pulp that evolved from a general-radio magazine to one intended for ham radio operators, it had its own style and tone, a little slicker than that of "QST" and focused on building equipment and operating -- mostly, chasing DX. ("Radio" eventually gave rise to today's "CQ" magazine.)
In his letter to the editor of "Radio," W8QBW is thinking about a 6L6 power oscillator merely as a driver for some big tubes, operating at several hundred Watts.
Instead, once he'd got his prototype working, he put it on the air -- and found himself on a very different path.
_____________________________________
* Many models of rheostats had "live" shafts by design. So the knobs were designed to provide a level of protection the 1930s found adequate. Ohmite's design was ubiquitous and worked well; it's pretty much the default choice for hams and experimenters from the late 20s through WW II.
He got away with it because he was very aware of the dangers. You probably haven't spent your ham career being "tickled" by the occasional contact with B+ batteries; you are unlikely to have ever used a #2 pencil to draw a hissing arc from the tank coil of a transmitter and it is almost certain you have never keyed a spark transmitter operating from wall-socket juice. So you and I don't have quite the same learned reflexes the old-timers had.
One of the less obvious "gotchas" in the QSL-40 is the DC power connection; it's a 5 or 6-pin socket on the back of the transmitter and the output from the power supply is connected to a plug. That's dangerous; there's all manner of juice on those pins. You could still buy that kind of plug and socket new through last year -- it looks as if Cooper Interconnect has discontinued them -- but they work just as well with the plug mounted to the transmitter side and the socket on the power supply.
The big RF coil's connections are "live," too; you must keep your fingers clear of them when tuning the transmitter. For that matter, the tuning knob provides the only isolation from HV DC on the shaft of the tuning condenser. He picked the right knob for the job, an Ohmite rheostat knob* made of real Bakelite with a deeply-recessed setscrew, but you probably haven't got one of those handy. So that may need to be designed around. The power supply design is simply unsafe; he used a ceramic-base knife switch to turn the B+ off and on, at a point 600 VAC above ground. He took precautions, but he had experience and parts that cannot be obtained today. I'm working on a "modernized" redesign of the power supply and hope to have a tentative version posted some time this weekend.
There's a little about safety. Now, about history--
There was a whole series of "QSL" rigs, from a 5W transformerless "portable" you could hold in one hand (though not when it was plugged in!) to a 100W push-pull design, with side ventures into a tiny receiver, making "air-wound" RF coils and the use of pilot lights as current indicators.
It had to start somewhere. It didn't start where you'd think or even with the goal you might expect:
 "Radio" was, in some ways, the West Coast competition to the ARRL's "QST." Formed by the merger of "R/9," a smaller ham magazine with very high production values and the original "Radio," a large-format pulp that evolved from a general-radio magazine to one intended for ham radio operators, it had its own style and tone, a little slicker than that of "QST" and focused on building equipment and operating -- mostly, chasing DX. ("Radio" eventually gave rise to today's "CQ" magazine.)
In his letter to the editor of "Radio," W8QBW is thinking about a 6L6 power oscillator merely as a driver for some big tubes, operating at several hundred Watts.
Instead, once he'd got his prototype working, he put it on the air -- and found himself on a very different path.
_____________________________________
* Many models of rheostats had "live" shafts by design. So the knobs were designed to provide a level of protection the 1930s found adequate. Ohmite's design was ubiquitous and worked well; it's pretty much the default choice for hams and experimenters from the late 20s through WW II.
THE QSL-40
This is an experiment. It is for amateur use only and I may have to take it down, the copyright holder being very much with us (and well worth your time, attention and memberhip).
But for now, a quick look at the project article that launched Fred Sutter's "QSL" transmitters, all using some version of the 6L6 tube:

 Readers with an eye to history -- or who notice the cut-and-paste -- should be aware the original schematic left out the cathode bypass condenser, replacing it with a direct connection. That meant the telegraph key wouldn't have worked, the transmitter would have been on all the time. QST published a corrected schematic the following month and I pasted that over the erroneous one.
(I have built my own copy of this little transmitter.)
For the record, this transmitter has a lot of exposed high voltage. It is inherently dangerous. Before building and operating such equipment, be certain you understand the risks.
But for now, a quick look at the project article that launched Fred Sutter's "QSL" transmitters, all using some version of the 6L6 tube:


 Readers with an eye to history -- or who notice the cut-and-paste -- should be aware the original schematic left out the cathode bypass condenser, replacing it with a direct connection. That meant the telegraph key wouldn't have worked, the transmitter would have been on all the time. QST published a corrected schematic the following month and I pasted that over the erroneous one.
(I have built my own copy of this little transmitter.)
For the record, this transmitter has a lot of exposed high voltage. It is inherently dangerous. Before building and operating such equipment, be certain you understand the risks.
Wednesday, March 23, 2011
THE 6L6 JOB
Not a spy movie but a family of homebrew ham transmitters. The 6L6 is a beam power pentode vacuum tube introduced by RCA in 1936 that kind of caught on -- and caught on big: they're still making them. You'll find them in guitar amplifiers and some esoteric hi-fi amps, too (though purists there are now into triodes and are keeping the WeCo 300B in production for the rest of us).
Hams quickly latched onto the new tube -- it was relatively inexpensive for the power level -- and even though it was marketed as an audio amplifier, the lost no time in seeing if the 6L6 was happy with RF.
It was. Eventually, even RCA had to admit it and someone in the transmitting tube managed to sneak the 807 into production -- essentially, a souped-up, RF-ready 6L6.* But the cheaper receiving tube had won a place in the amateur pantheon and went on the become the heart of thousands of little transmitter designs. (There were plenty of 807 ham rigs built, too).
Fred Sutter's "QSL" series of transmitters -- so named because the little rigs had a footprint no larger than a 4" x 5" postcard (hams exchange QSL cards to confirm two-way contact: talk to enough people, far enough away, and you can get a fancy award!) -- were justly famous; mine is safely (I hope) stashed away Somewhere Around here. Frank Jones (of Radio magazine ham handbook fame) offered his own versions (schematic and a nice example at this link) and I have built a couple of those: The first one is a sort-of breadboard: the DC and heater wiring is all underneath. The empty socket at the left is for the frequency-determining crystal, the first variable condenser is plate tank tuning and the second one is output loading. But its a 1930s design, with relatively low-C (50 pF) and the output circuit is not a pi-network: the "loading" condenser is fed from a center-tap on the tank coil. This means harmonics do get out; at my former location, the first time I fired it up on 80 meters, the ham down the alley was knocking on my hamshack window in minutes, having copied my callsign via his TV receiver. (It did okay on 40 meters). This little rig worked all over the continental U.S. The frames of both tuning condensers are "hot" with plate voltage, by the way, but stubby insulating couplings and nice big knobs reduce the odds of getting bit. (Key jack, lower left, is in the cathode-ground circuit -- touch the cathode side when the key is open and you'll get a nasty tingle).
Another 6L6 rig, I built in a candy tin. Shown here sitting atop my RME-45 receiver to show how small it is (and to show off the receiver; I was copying W1AW and trying to keep up with some QRS guys earlier tonight, with a 6' hank of wire for an antenna since there was a storm outside: RME built good receivers). There should be a coil plugged in the socket at the right -- my box of transmitting coils is also Around Here Somewhere. This one does have a newer-type pi-net output, though a little more C on the output side wouldn't hurt. The crystal socket is out of sight behind the tube.
 And here's the mysterious inner workings -- a couple of RF chokes (plus the tinned-busbar VHF choke just left of center -- the breadboard rig has one, too), a voltage divider for the screen, grid resistor, feedback condenser, cathode resistor and a whole lot of bypass condensers. The BNC connector was for a VFO but I never wired it up. there are a couple of little braces soldered in place, too -- the sheet metal candy tins are made of isn't as sturdy as a real chassis. Oh, don't be fooled by the meter scale (0 to 5 Amps); that's one of a batch of meters surplussed from a 1950s RCA commercial transmitter, all 1 Ma/1 V/1kOhm. Very easy to shunt for the range desired, in this case 0-100 mA).
___________________________
*All-glass, with a low-loss base; 6L6s were made in both metal and glass-envelope variants. Much later, the 807 begat the TV receiver sweep tube 6BG6, little more than an 807 with an octal base. The 6L6 was scaled down (6V6), scaled up (6550) and made in industrial versions, too.
Hams quickly latched onto the new tube -- it was relatively inexpensive for the power level -- and even though it was marketed as an audio amplifier, the lost no time in seeing if the 6L6 was happy with RF.
It was. Eventually, even RCA had to admit it and someone in the transmitting tube managed to sneak the 807 into production -- essentially, a souped-up, RF-ready 6L6.* But the cheaper receiving tube had won a place in the amateur pantheon and went on the become the heart of thousands of little transmitter designs. (There were plenty of 807 ham rigs built, too).
Fred Sutter's "QSL" series of transmitters -- so named because the little rigs had a footprint no larger than a 4" x 5" postcard (hams exchange QSL cards to confirm two-way contact: talk to enough people, far enough away, and you can get a fancy award!) -- were justly famous; mine is safely (I hope) stashed away Somewhere Around here. Frank Jones (of Radio magazine ham handbook fame) offered his own versions (schematic and a nice example at this link) and I have built a couple of those:
 The first one is a sort-of breadboard: the DC and heater wiring is all underneath. The empty socket at the left is for the frequency-determining crystal, the first variable condenser is plate tank tuning and the second one is output loading. But its a 1930s design, with relatively low-C (50 pF) and the output circuit is not a pi-network: the "loading" condenser is fed from a center-tap on the tank coil. This means harmonics do get out; at my former location, the first time I fired it up on 80 meters, the ham down the alley was knocking on my hamshack window in minutes, having copied my callsign via his TV receiver. (It did okay on 40 meters). This little rig worked all over the continental U.S. The frames of both tuning condensers are "hot" with plate voltage, by the way, but stubby insulating couplings and nice big knobs reduce the odds of getting bit. (Key jack, lower left, is in the cathode-ground circuit -- touch the cathode side when the key is open and you'll get a nasty tingle).
Another 6L6 rig, I built in a candy tin. Shown here sitting atop my RME-45 receiver to show how small it is (and to show off the receiver; I was copying W1AW and trying to keep up with some QRS guys earlier tonight, with a 6' hank of wire for an antenna since there was a storm outside: RME built good receivers).
 There should be a coil plugged in the socket at the right -- my box of transmitting coils is also Around Here Somewhere. This one does have a newer-type pi-net output, though a little more C on the output side wouldn't hurt. The crystal socket is out of sight behind the tube.
 And here's the mysterious inner workings -- a couple of RF chokes (plus the tinned-busbar VHF choke just left of center -- the breadboard rig has one, too), a voltage divider for the screen, grid resistor, feedback condenser, cathode resistor and a whole lot of bypass condensers. The BNC connector was for a VFO but I never wired it up. there are a couple of little braces soldered in place, too -- the sheet metal candy tins are made of isn't as sturdy as a real chassis. Oh, don't be fooled by the meter scale (0 to 5 Amps); that's one of a batch of meters surplussed from a 1950s RCA commercial transmitter, all 1 Ma/1 V/1kOhm. Very easy to shunt for the range desired, in this case 0-100 mA).
___________________________
*All-glass, with a low-loss base; 6L6s were made in both metal and glass-envelope variants. Much later, the 807 begat the TV receiver sweep tube 6BG6, little more than an 807 with an octal base. The 6L6 was scaled down (6V6), scaled up (6550) and made in industrial versions, too.
Tuesday, March 15, 2011
A REMARKABLE GIFT
I suppose you could argue it's not a gift, as it replaces most of the content in the Spring number of The Indiana Historical Radio Society Bulletin. It was nevertheless wholly unexpected and quite delightful: It's a crystal set, sent out to commemorate the 40th Anniversary of this fine organization.
Like (I suspect) most members, I took mine to the radio room immediately and hooked it up. It works just fine; one tunes it by fanning out the hank of wire into a section of a torus; a full half-donut hits near the upper end of the broadcast band and a few degrees in from there finds WNDE (1260 kc/s), clear as a bell and plenty loud.
This nicely-framed xtal set is a variation on the "postcard crystal radio" of days gone by, a little bit of the past brought forward.
 It's a crystal set, sent out to commemorate the 40th Anniversary of this fine organization.
Like (I suspect) most members, I took mine to the radio room immediately and hooked it up. It works just fine; one tunes it by fanning out the hank of wire into a section of a torus; a full half-donut hits near the upper end of the broadcast band and a few degrees in from there finds WNDE (1260 kc/s), clear as a bell and plenty loud.
This nicely-framed xtal set is a variation on the "postcard crystal radio" of days gone by, a little bit of the past brought forward.
Monday, March 14, 2011
Sunday, March 13, 2011
CLEAN SIGNALS FOR 1929
It was the (international!) law, but it would have been a good idea even if it hadn't been required: beginning in 1929, radio amateurs had to build their transmitter to meet nominal requirements for stability and spectral purity.
The rules weren't especially stringent; existing designs could be adapted and a beginner's transmitter wouldn't cost any more, though it might take more time to adjust. The benefit was that sharp, stable signals get through where wobbly, "squeggy" ones would prove too hard to read.
...It happens that for radiotelegraphy, a "1929 type" transmitter still makes signals stable enough and clean enough for amateur use. Even if the other ham is running a software-based radio on a plug-in computer card, he (or she) can tune it in.
And you can build one! Canadian ham VE7SL shows how, complete with original schematic, recent photos, modern schematic and ways to couple it into your coax-fed antenna, and then ends with a photographic round-up of 1929-style breadboard rigs by a dozen-odd builders. (And if you'd rather build Ross Hull's wonderful 1929 Hartley, why, he'll show you that one, too!)
I'm going to have dust mine off. H'mm, I need to find me a type '45 or '10 transmitting tube.*
___________________________
* The ' in place of a first digit replaces the manufacture's ID number -- "2" for RCA, for example.
Saturday, March 5, 2011
THE FIRST AIRCRAFT CARRIERS
They not be quite what you're picturing; nowadays, "aircraft carrier" summons up an image of a floating airfield nearly the size of a Georgia county.*
But you have to start somewhere; the British started before the 20th Century was two decades old, with the Thorneycroft Seaplane Lighter: a ship. That carried aircraft. An aircraft, in fact: singular. And it was on its own for the taking off and landing.
It might sound a little mad but the concept worked so well for the Royal Navy that they built 46 of them. There was one "survivor" known, but it was stuck in the mud and corroded away.
And then a maritime journalist spotted one in the Thames -- stuck, rusting, but remarkably intact!
It is presently being restored and will be displayed at the Fleet Air Arm Musem: an aircraft carrier not much larger than a modest modern houseboat; but an aircraft carrier all the same.
__________________________________
* Originally required to have no border farther than a half-day's horseback ride from the county seat. Not a bad idea, especially in light of modern-day fuel prices.
Friday, March 4, 2011
USEFUL LINKS
Clock parts -- for instance, the easily-breakable glass over the dial -- gears, hands and a staggering lot more: Timesavers. I may be able to put my vintage hamshack clock back in service!
Battery eliminators for very old radios: delightful versions housed in cases styled like classic radio batteries can be found at Antique Radios, Inc. Or you can get them with a plain case, if you'd rather. Since the older battery sets usually have you juggling a high-current 6V "A" battery (lead-acid, originally, and who wouldn't want that in the parlor?), several "B" batteries of up to 180 Volts (if you'd gone all out and bought a big loudspeaker) and "C" batteries for tube bias in the 4.5 to 45 Volt range, you can see that a nice battery eliminator would be a thing of beauty. Back in the days when wall-socket juice was the most modern of modern conveniences, a little company called Raytheon turned exactly that product into a lasting legacy; they're still building high-end electronic widgetry today.
The source or inspiration of these links would be FB ham operator W1UJR. If you like classic ham gear, you'll want to see what's in his hamshack.
Thursday, March 3, 2011
IT'S THE ULTIMATE
 At first glance, you might well ask, "Ultimate what?"
Mine has two levers; not all of these keys do. The right-hand one is moved to the left and makes a simple contact closure. The left-hand, moved to the left, does the exact same thing. So why's the other one there? I don't know.
The fun begins when you move the left-hand lever to the right. That's where the semiautomatic action starts to make the "dits" (usually written as "dots") for you. Like most other bug keys, it uses a weighted pendulum and a flat spring or reed to bounce back and forth; but the way this key shoves the pendulum into motion is madly complex, a square ascending spiral involving three levers, two pivots and a roller! I've tried to trace it:

 And if you weren't confused enough, here's a back view that shows the around-two-corners lever a little more clearly.
I first saw one of these keys in 1996 at a railroad museum in French Lick, Indiana; it was in a display case and I was unable to get a clear enough look at it to figure out how it worked. I've wanted one ever since.
Photo links are from this page at Tom Perera's online museum, where a key-fancier can easily spend hours. I was able to find a few more examples via a websearch as well.
Tuesday, March 1, 2011
MCELROY "JUNIOR," AGAIN
I have written of them in the past and a reader recently pointed out another one: the McElroy "Junior," a semi-automatic telegraph key built for the ham or telegrapher of limited means.
The base and frame were made of stamped and welded sheet metal and they were the least-expensive bug ever made. They're also vanishingly rare, which leads to an interesting quirk: while you can find a nice Mac "T-bar" bug for about $500 and his high-end models for up to a couple hundred more, the humble little "Junior" sells for as much as -- see for yourself: Yes, that's $1026.01. I did not bid on it; bidding rises early on these and keeps on going up.
I do note, very typical of McElroy, that the inner construction appears to be quite robust and seems to include some kind of additional pivot support; mechanically it is a better key than first glance might suggest.
The base and frame were made of stamped and welded sheet metal and they were the least-expensive bug ever made. They're also vanishingly rare, which leads to an interesting quirk: while you can find a nice Mac "T-bar" bug for about $500 and his high-end models for up to a couple hundred more, the humble little "Junior" sells for as much as -- see for yourself:
 Yes, that's $1026.01. I did not bid on it; bidding rises early on these and keeps on going up.
I do note, very typical of McElroy, that the inner construction appears to be quite robust and seems to include some kind of additional pivot support; mechanically it is a better key than first glance might suggest.
Sunday, February 27, 2011
NEW? OLD? USEFUL!
What fits in a mint tin and lets the 19th Century communicate with the 21st?
It's not a real riddle, it's the Morse key USB keyboard! A nifty little interface that connects to a telegraph key on one end and on the other, tells your computer it's a USB keyboard.
While first at glance you might see only hobbyist fun (and big fun indeed for some of us), there's a serious side to this kind of interface, too: persons with limited mobility or strength who are unable to use a conventional keyboard can use a telegraph key. It has been done before, usually in the form of software running on a dedicated machine with a specialized interface; this is plug'n'play, portable. USB connection, Dr. Hawking?
Downside, you'll need the hardware/software to flash an Arduino-compatible microcontroller. Or know someone who can.
Update: If you'd like to match this to a landline telegraph sounder, Jake von Slatt's sounders are a scratch-built solution; the morse2led software he uses to drive them (from a keyboard led) would also work a commercial sounder, piezo buzzer or electromagnetic buzzer, though you might have to fiddle with the drive ciruits a little.
If you were wondering, yes, there is Morse telegraphy on the Internet. The software is free. The linked page, at the wonderful Morse Telegraph Club website, will guide you to sites and software, some using landline (or American) Morse and others using radio (or International) telegraph codes
Tuesday, February 8, 2011
GET YOUR POLAROID BACK OUT
Yes, even the SX-70: The Impossible Project is making film for them! And for a number of other classic Polaroid cameras.
Polaroid themselves got out of the instant film business in 2008; a group of enthusiasts bought up the machinery from the last few plants, leased space from Polaroid and...started from scratch on the chemistry: Polaroid had made their own dyes, etc. and it was information they couldn't share. It seemed impossible -- but it wasn't.
A couple of years ago, I packed away my Dad's old SX-70, thinking it was long odds it would ever take another photograph. Looks like I was wrong.
It's not that "retro," but it was a lost technology and now it's back. It will probably never again be the preferred choice for vacation snapshots but it is certainly nice to have the option.
(First found here, thanks to her).
Monday, February 7, 2011
TOY STEAM
I only know what I have seen on their website, but MiniSteam has me totally enthralled: more tabletop steam (and everything from Stirling to internal combustion) engines than I have ever seen in one storefront, from a huge variety of makers. Even steam robots -- see for yourself.
There and elsewhere, my dream toy for the summer, a Stirling-engine fan.
Prices on many of them are not for the faint of heart -- but it's wonderful stuff to see.
There and elsewhere, my dream toy for the summer, a Stirling-engine fan.
Prices on many of them are not for the faint of heart -- but it's wonderful stuff to see.
Tuesday, January 11, 2011
WE302
WE302? The standard desk phone. The 500-series phone that followed was just the same thing slicked-up for the sixties.
I've got one. If you call Roseholme Cottage (CLifford 3-....), that's what gets picked up. Blogger Keads has one, too -- with the original number card!
Treated well, a Western Electric 302 is nearly indestructible. Most phone systems will still accept pulse-dialing, too, and for the ones that don't, you can get magic pulse-to-touchtone widgets. The cloth cords can fray over time; Phoneco will sell you new ones, with all the proper lugs and anchors.
Subscribe to:
Posts (Atom)

