
And in computers, yet? That's the report, though they're not going to look very much like the 6SN7s in Grandpa's flip-flops; nuvistors would look like skyscrapers beside them. Still and all, tubes. Who would've thought?
Thursday, August 30, 2012


Sunday, July 22, 2012
CALLSIGN NABD, USS INDIANAPOLIS, CA-35
She was torpedoed in the Pacific 30 July, 1945, after delivering an atom bomb to Tinian. Of 1,196 crew, some 900 made it into the shark-infested water. Despite sending a distress call, the sinking went unnoticed for five days. Only 317 men survived. It remains one of the worst U. S. naval disasters.
The USS Indianapolis Memorial is here in Indianapolis, and a room of the Indiana War Memorial Museum is dedicated to the ship. Just around the corner in the War Memorial, volunteers have recreated the ship's "Radio Central," piece by piece.
11 of the 41 radiomen were among the survivors.
The original installation is gone with the ship, but the equipment was quite standardized. "Was" being the operational word, as much of it has become quite scarce. The old receivers were uncommonly good -- and uncommonly heavy; the transmitters were even more so, on both counts.
So simply collecting the equipment is a huge accomplishment. But the volunteers are committed to more than mere static display -- they're getting the old gear running!
Entry is very much like stepping into a busy radio room -- CW in the background (including "SOS SOS de NABD...") and recorded talk about the gear plays at several positions. Visitors walk down a narrow aisle between transmitters and the test bench before coming to the row of operating positions. Left:
 Center:
 Right:
 Ship's radio rooms are a pretty fair match for the ideal ham shack, too, though I don't suppose very many of the guys copy traffic on a "mill" these days. (And I wonder if there might not be a few southpaws on the crew -- or did the Navy train ops to send left-handed?)
The transmitters cover from low frequencies all the way into VHF, with "big rigs" into the upper HF range. The big transmitters are right there where you can get a good look.
 The TBS low VHF transmitter-receiver they've been getting into operating condition is kept far enough away to keep curious fingers safe. You can just see the side of it in the right-side image of the operating positions -- the acronym for this is sometimes (and unofficially) translated "Talk Between Ships" and sure enough, my Dad's 1946 Introduction to Radio Equipment, NAVPERS 10172* says it was "designed to provide short-range communications between surface craft such as task forces or convoys." Interestingly, the book covers operation of just about every receiver and transmitter in the USS Indianapolis Radio Room exhibit.
It's a fascinating installation. It includes a couple of Amateur Radio operating positions, at the Supervisor and Test desks, operating as WW2IND: The more modern ham gear is kept out of sight when not in use, but pipe that shiny green SP-600! I'll be back -- the museum is not very far from where I work and they tell me volunteers are present many mornings and all day most Thursdays.
________________________________
* This book was my first exposure to the technical side of radio, and does a pretty good job of covering basic theory before moving on to specific equipment. The Naval Reserve, when they learned my father worked for RCA, was determined to make him a radioman...until realizing he didn't know International Morse code. Rather than run a reservist through radio-op school, they set him to toting bags of powder in a gun turret. Which is, if you ask me, one more reason to learn CW! Why'd they think Dad would be a radioman? Have a close look at the photos and you'll see a discreet RCA "meatball" on an awful lot of Navy comms gear; RCA and radio were just about synonyms, as far as the Navy was concerned. There are only two non-RCA receivers on the entire NABD operating bench shown above, in fact -- can you ID them?
The USS Indianapolis Memorial is here in Indianapolis, and a room of the Indiana War Memorial Museum is dedicated to the ship. Just around the corner in the War Memorial, volunteers have recreated the ship's "Radio Central," piece by piece.
11 of the 41 radiomen were among the survivors.
The original installation is gone with the ship, but the equipment was quite standardized. "Was" being the operational word, as much of it has become quite scarce. The old receivers were uncommonly good -- and uncommonly heavy; the transmitters were even more so, on both counts.
So simply collecting the equipment is a huge accomplishment. But the volunteers are committed to more than mere static display -- they're getting the old gear running!
Entry is very much like stepping into a busy radio room -- CW in the background (including "SOS SOS de NABD...") and recorded talk about the gear plays at several positions.
 Visitors walk down a narrow aisle between transmitters and the test bench before coming to the row of operating positions. Left:
 Center:
 Right:
 Ship's radio rooms are a pretty fair match for the ideal ham shack, too, though I don't suppose very many of the guys copy traffic on a "mill" these days. (And I wonder if there might not be a few southpaws on the crew -- or did the Navy train ops to send left-handed?)
The transmitters cover from low frequencies all the way into VHF, with "big rigs" into the upper HF range.
 The big transmitters are right there where you can get a good look.
 The TBS low VHF transmitter-receiver they've been getting into operating condition is kept far enough away to keep curious fingers safe. You can just see the side of it in the right-side image of the operating positions -- the acronym for this is sometimes (and unofficially) translated "Talk Between Ships" and sure enough, my Dad's 1946 Introduction to Radio Equipment, NAVPERS 10172* says it was "designed to provide short-range communications between surface craft such as task forces or convoys." Interestingly, the book covers operation of just about every receiver and transmitter in the USS Indianapolis Radio Room exhibit.
It's a fascinating installation. It includes a couple of Amateur Radio operating positions, at the Supervisor and Test desks, operating as WW2IND:
 The more modern ham gear is kept out of sight when not in use, but pipe that shiny green SP-600! I'll be back -- the museum is not very far from where I work and they tell me volunteers are present many mornings and all day most Thursdays.
________________________________
* This book was my first exposure to the technical side of radio, and does a pretty good job of covering basic theory before moving on to specific equipment. The Naval Reserve, when they learned my father worked for RCA, was determined to make him a radioman...until realizing he didn't know International Morse code. Rather than run a reservist through radio-op school, they set him to toting bags of powder in a gun turret. Which is, if you ask me, one more reason to learn CW! Why'd they think Dad would be a radioman? Have a close look at the photos and you'll see a discreet RCA "meatball" on an awful lot of Navy comms gear; RCA and radio were just about synonyms, as far as the Navy was concerned. There are only two non-RCA receivers on the entire NABD operating bench shown above, in fact -- can you ID them?
Thursday, July 19, 2012
BEESWAX
It's your beeswax -- or it should be. I was reminded of this useful substance just yesterday, when making some changes to the short end of my 40 Windom. I added a cleat for the line holding the feedpoint insulator and a screweye and a cleat for the far end of the short section, both of them in different 7'-tall 4X4 fence posts.
It's still dreadfully hot, so I was cheating, using a battery-powered drill to predrill for and drive the screws. Spinning home the first 2" #10 woodscrew, I found it was taking excessive torque. The driver bit was "camming out" of the screw head, to the detriment of both.
What to do, what to do... Then I remembered the bar of beeswax in the kitchen, purchased for just this problem. With a generous amount of the wax scrubbed into the screw threads, they sank almost too easily. Even driving the 5/16" screweye with a heavy screwdriver through the loop, it went in fast and easy.
Some old texts suggest using bar soap to lubricate screws, but soap will draw moisture and rust the screw. Beeswax is just the ticket -- it works nicely on saw blades, too. Best to store it tightly wrapped up in waxed paper, to keep it from drying out.
(Note to myself: I need to tie actual cleat hitches in the lines! Multiple figure-8s will do for awhile but a real knot is better.)
 I was reminded of this useful substance just yesterday, when making some changes to the short end of my 40 Windom. I added a cleat for the line holding the feedpoint insulator and a screweye and a cleat for the far end of the short section, both of them in different 7'-tall 4X4 fence posts.
It's still dreadfully hot, so I was cheating, using a battery-powered drill to predrill for and drive the screws. Spinning home the first 2" #10 woodscrew, I found it was taking excessive torque. The driver bit was "camming out" of the screw head, to the detriment of both.
What to do, what to do... Then I remembered the bar of beeswax in the kitchen, purchased for just this problem. With a generous amount of the wax scrubbed into the screw threads, they sank almost too easily. Even driving the 5/16" screweye with a heavy screwdriver through the loop, it went in fast and easy.
Some old texts suggest using bar soap to lubricate screws, but soap will draw moisture and rust the screw. Beeswax is just the ticket -- it works nicely on saw blades, too. Best to store it tightly wrapped up in waxed paper, to keep it from drying out.
(Note to myself: I need to tie actual cleat hitches in the lines! Multiple figure-8s will do for awhile but a real knot is better.)
Wednesday, July 18, 2012
MINIATURE SOLDERING IRON REVIEW
One of these days, I'll do a big soldering-iron round-up, everything from the big American Beauty 100 and 75W irons though the nice Hakko and Weller midsize irons down to the tiniest.
One of the very smallest irons in my toolbox, I haven't found since I moved: Wahl used to make a corded, variable-temperature miniature iron that I count among the finest ever built. I purchased a similar Far Eastern iron some years ago at the Dayton Hamvention, only to discover it doesn't get hot enough to actually solder with.
I needed a replacement miniature iron. The Radio Society of Great Britain talks up Antex brand irons in their Handbook and they do look good; I've found RSGB to be an impartial reviewer, and when I realized the Antex G/3U 18W miniature iron (that may be an older model number but you can still buy 'em over here) listed on Amazon and elsewhere, I decided to find out for myself. I used it to build a Vectronics audio filter kit.* It worked very well. I was concerned that the tips slid on a little too loosely; but it gets plenty hot, plenty fast, and the tip stays in place. Like the Wahl, tips go over the heating element rather than inside. It's claimed to enable better heat transfer; it certainly makes for less iron in the way of the work.
The one shown here has a chisel tip, about 1/16" wide. The kit was through-hole ICs, with 0.10" being the closest spacing and there was no need for anything smaller.
The grip stays cool and the assembly is a good size and balance. It does require a heavy stand, as it weighs so little that if it's not securely held, the cord can drag it around! The Hako stand shown here is not a good choice -- the kind that surrounds the iron with a coiled spring-looking holder would be best. But that's my only complaint. G/3U is a good iron for small work. They're listing for just over $28, last I checked.
______________________________________
* Which shipped with the wrong value resistors for one of the critical frequency-determining positions, 2X for three filter sections. Off by a factor of 10. Oops! But the right resistors are a dime apiece, and that gets fancy 2% metal-film types, so it's not a big deal.
One of the very smallest irons in my toolbox, I haven't found since I moved: Wahl used to make a corded, variable-temperature miniature iron that I count among the finest ever built. I purchased a similar Far Eastern iron some years ago at the Dayton Hamvention, only to discover it doesn't get hot enough to actually solder with.
I needed a replacement miniature iron. The Radio Society of Great Britain talks up Antex brand irons in their Handbook and they do look good; I've found RSGB to be an impartial reviewer, and when I realized the Antex G/3U 18W miniature iron (that may be an older model number but you can still buy 'em over here) listed on Amazon and elsewhere, I decided to find out for myself.
 I used it to build a Vectronics audio filter kit.* It worked very well. I was concerned that the tips slid on a little too loosely; but it gets plenty hot, plenty fast, and the tip stays in place. Like the Wahl, tips go over the heating element rather than inside. It's claimed to enable better heat transfer; it certainly makes for less iron in the way of the work.
The one shown here has a chisel tip, about 1/16" wide. The kit was through-hole ICs, with 0.10" being the closest spacing and there was no need for anything smaller.
The grip stays cool and the assembly is a good size and balance. It does require a heavy stand, as it weighs so little that if it's not securely held, the cord can drag it around! The Hako stand shown here is not a good choice -- the kind that surrounds the iron with a coiled spring-looking holder would be best. But that's my only complaint. G/3U is a good iron for small work. They're listing for just over $28, last I checked.
______________________________________
* Which shipped with the wrong value resistors for one of the critical frequency-determining positions, 2X for three filter sections. Off by a factor of 10. Oops! But the right resistors are a dime apiece, and that gets fancy 2% metal-film types, so it's not a big deal.
Thursday, May 31, 2012
4:1 AIR-CORE BALUN
For my own reference as much as yours, a little more detail on the balun I'm using with my new Windom antenna. The starting point was this web page.
The PVC pipe on hand here was 1-5/8" in diameter, so I dropped a turn (or a little less -- just over 11 turns for each of the two wires), figuring if it didn't work, I'd start over. It's also only got one color of wire, as I have a nice big spool of sky-blue insulated #14, purchased awhile back for antenna experiments. I scribbled on the ends of one winding with a black marker. You don't even really have to do that, since the bifilar windings are flat: the wire that starts on top, ends on top. Here's the completed balun: And a close-up of the connections at the coax end:
 The top end is just 6-32 nuts and bolts (mostly brass) and solder lugs.
Here it is all wrapped up in self-amalgamating tape: It didn't change the tuning, so I guess it must be okay stuff at 7 mc/s.
Refinements: use fatter brass hardware for the antenna connections. Use polystyrene drain tubing, sold as "styrene" for the coil form: it has better properties than PVC at HF. Mount the coax connection facing down! And you could do like the pros and encapsulate the whole thing in PVC pipe. (I have one somewhere around here, a slightly more sophisticated trifilar job, coated with epoxy. It had held up well, last time I saw it. --If I could only remember where!)
The PVC pipe on hand here was 1-5/8" in diameter, so I dropped a turn (or a little less -- just over 11 turns for each of the two wires), figuring if it didn't work, I'd start over. It's also only got one color of wire, as I have a nice big spool of sky-blue insulated #14, purchased awhile back for antenna experiments. I scribbled on the ends of one winding with a black marker. You don't even really have to do that, since the bifilar windings are flat: the wire that starts on top, ends on top. Here's the completed balun:
 And a close-up of the connections at the coax end:
 The top end is just 6-32 nuts and bolts (mostly brass) and solder lugs.
Here it is all wrapped up in self-amalgamating tape:
 It didn't change the tuning, so I guess it must be okay stuff at 7 mc/s.
Refinements: use fatter brass hardware for the antenna connections. Use polystyrene drain tubing, sold as "styrene" for the coil form: it has better properties than PVC at HF. Mount the coax connection facing down! And you could do like the pros and encapsulate the whole thing in PVC pipe. (I have one somewhere around here, a slightly more sophisticated trifilar job, coated with epoxy. It had held up well, last time I saw it. --If I could only remember where!)
Tuesday, May 29, 2012
THE WINDOM
The G5RV -- more of a "bent extended double Zepp," which I think Varney would have disavowed -- I use doesn't load up well on 40 meters. It's been arranged to fit the available space and it's just not that good a match.
I don't worry much -- if you can get some energy into your antenna, it'll work even with lousy SWR -- but it was pretty bad.
So I put up an off-center-fed 40 m dipole, a sort of a coax-fed Windom.* With the feedpoint at the 80%/20% point, it should look close to 200 Ohms and take a 4:1 transformer to present a decent match to 50 Ohms.
The antenna part is easy enough -- take 67' of wire and divide accordingly, then make it fit (I ended up having to bend both ends).
The transformer... It was a holiday. The ham store we haven't got was closed. But all you really need is wire and a coil form (PVC pipe) and a little hardware: (The branch is not really that close to it.) Ended up with 11 bifilar turns of #14 house wire on approximately 1- 1/2" diameter PVC. Hams get all worked up over these but with about three bucks of materials in it, this version is not too painful to have to redo from scratch if the first try doesn't work. My design is all rule-of-thumb and fudge-factored from other versions on the Web.
Here's a funny angle on the transformer and one of the bends: It's about 20' up at the highest points.
Finished it after dark -- I'd installed a coax feedthrough but had to put the connectors on the coax -- and had a QSO within minutes of getting on the air. (Real DX: Warsaw, IN) And it tunes up on 40 meters just fine!
______________________________
* Loren G. Windom, W8GZ, yet another of the antenna-designing hams from Columbus, OH. You may have heard of the other one -- W8JK, John Krause, of the 8JK HF beam and the helical antenna (both modes!).
I don't worry much -- if you can get some energy into your antenna, it'll work even with lousy SWR -- but it was pretty bad.
So I put up an off-center-fed 40 m dipole, a sort of a coax-fed Windom.* With the feedpoint at the 80%/20% point, it should look close to 200 Ohms and take a 4:1 transformer to present a decent match to 50 Ohms.
The antenna part is easy enough -- take 67' of wire and divide accordingly, then make it fit (I ended up having to bend both ends).
The transformer... It was a holiday. The ham store we haven't got was closed. But all you really need is wire and a coil form (PVC pipe) and a little hardware:
 (The branch is not really that close to it.) Ended up with 11 bifilar turns of #14 house wire on approximately 1- 1/2" diameter PVC. Hams get all worked up over these but with about three bucks of materials in it, this version is not too painful to have to redo from scratch if the first try doesn't work. My design is all rule-of-thumb and fudge-factored from other versions on the Web.
Here's a funny angle on the transformer and one of the bends:
 It's about 20' up at the highest points.
Finished it after dark -- I'd installed a coax feedthrough but had to put the connectors on the coax -- and had a QSO within minutes of getting on the air. (Real DX: Warsaw, IN) And it tunes up on 40 meters just fine!
______________________________
* Loren G. Windom, W8GZ, yet another of the antenna-designing hams from Columbus, OH. You may have heard of the other one -- W8JK, John Krause, of the 8JK HF beam and the helical antenna (both modes!).
Saturday, May 19, 2012
DAYTON HAMVENTION, 2012
 Part of one row of the outside area -- less than a tenth of the total. There's no place to get a really good overview photograph but take it from me, the Hamvention is huge!
One commercial vendor offered miniature straight keys, J-38ish (the general Bunnell "Triumph" pattern, widely used in the U.S.) but about 3/8 full size. I wanted one...but didn't buy one on sight and, of course, could not find them again.
But that was all I missed at Dayton. I didn't buy anything large, but several smaller items came home with me along with plenty of photographs.
 Above, the Morse Telegraph Club, with a bit of the Vibroplex booth in the background. (I bought a couple of "Vari-Speed" attachments from Vibroplex, a nice pre-WW II invention the company brought back several years ago. The new owner and staff were there, with the full line of keys.)
 Begali! Peitro Begali is at the right, perhaps the best key designer alive (apologies to Mike Marsh, who does beautiful work) and certainly the most prolific; he demonstrated his Swedish-style straight key and let me give it a try. That blurry photo was the best I could get. The Begali booth is solidly busy all the time and a clear photo is all but impossible.
 Speaking of keys, that's the ballcap and one ear of Mr. Enigma (the WW II encryption device) and Mr. Keys himself, Professor Tom Perera, W1TP, and above him, a huge and very wondrous strange key, with two sets of contacts and adjustments galore.
 More keys. Readers of this blog will recognize the bugs, and perhaps the unusual Western Electric straight key at the top center, but how about the gadgets over at the right? They're "registers," with clockwork pulling a paper tape under a stylus that "writes" the incoming code as long or short lines. This technology preceded transcribing code by sound; it never occurred to Morse or Vail that anyone could manage that....until operators started doing it. The machines shown are roughly Civil War vintage.
 Here's a beauty! A Collins 20V3 AM broadcast transmitter, 1 kW with cutback to as low as 250 Watts. Once a stalwart of local "coffeepot" AMs, most surviving examples are either relegated to backup transmitter service or, like this one, have been converted to ham use. You can see two of the tubes glowing at the left; there's another pair at the right: 2 RF finals, 2 modulators. Originally, 2 or 4 mercury-vapor rectifiers would have been glowing a happy purple-blue at the bottom of the window. This rig was up on the bed of a small truck but it's odds-on the 866s have been replaced by solid-state diodes; most people don't enjoy the failure mode of M-V rectifiers, or the half-hour-plus warm-up time if you don't keep them cooking all the time. This rig offers a surprise for the unwary: there's 110 VDC on the RF output! It operates a relay that shuts the transmitter off if there's an arc, and will give you quite a jolt if you don't know about it. (BT, DT.)
 Another, even bigger transmitter, though I think it was a kiloWatt job, too. Originally it was a nice sober Gates gray. I was unable to capture the full glory of this repaint, complete with a yellow "tube guy," lightning bolts and floating eyeballs. Why? Why not! (Anything that keeps this old iron around and on the air is okay with me. Perhaps that's barbaric, but they are going to landfills in droves.)
 Not every transmitter requires its own truck. This is a "1929 type" high-C rig probably built in the 1980s. It's a directly-coupled high-power oscillator. ("High power" being some tens of Watts, with luck.) Some hams run these on the air -- properly set up, they work fine, despite a tendency to "yoop" mildly as the antenna sways in the breeze.
 Receivers! (One of those things is not like the others, and I don't mean the "doghouse" power supply for the HRO-7, second from left. Can you ID the odd box out?)
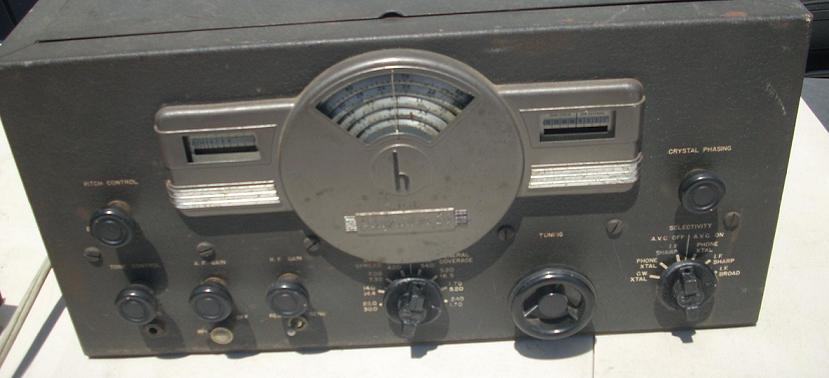 Hallicrafters, in fair shape.
 National, a WW II set, ditto.
 RCA, I think. In rough shape; you can't see the clock-type tuning scale, with "hour" and "minute" hand for reading down to the kilocycle. Or so.
 RME 69, with the hard-to-find preselector. I wanted to buy this one; it's in decent shape, unrestored, and the price was right. But it would need weeks of work and I am full up for projects. Note the absence of labels for the controls -- designer E. G. Shalkhauser, W9CI, was of the opinion anyone who would be operating the receiver should either be smart enough to figure them out or sufficiently interested to read the manual. RME made some of the best receivers of their day; after WW II, they built a few more models and were bought up by Electro-Voice. E-V eventually sold the name but it is tempting to wonder if some of the "DNA" remained: long after RME was gone, some retired E-V engineers started up a little ham radio company called Ten-Tec. They've done all right.
 This came home with me. Made right here in Indy, the EZ-TOON aftermarket vernier tuning knob! A 1920s aftermarket accessory for receivers.
 Found two of them. Here's the user's side.
Among my purchases: a couple of books from the RSGB, the previously-mentioned Varispeeds (and a contact burnisher: I nearly lost a QSO two days ago thanks to dirty key contacts!), a pair of 6BG6 tubes, a kind of an octal 807 beam power tube, some round "Ohmite" type knobs, an NOS Hammarlund plug-in coil form in the original box, ceramic standoff insulators and a National variable condenser.
And that's a glimpse of my day at the Hamvention. I'm thinking about driving back Sunday -- need to top up the oil in my car, first.
Subscribe to:
Posts (Atom)


